Maestro: A Designer’s Review for School Embroidery
When evaluating a new machine embroidery design for my production queue, I look beyond the digital preview. As someone who manages both custom client orders and a small shop inventory, I need to know how a file behaves under the needle and whether it translates into a sellable finished product. Maestro is a design that immediately caught my attention within the School category, but its application requires a thoughtful approach to ensure professional results. This review breaks down my practical experience testing Maestro for real-world projects, focusing on stitch integrity, fabric compatibility, and commercial viability for fellow makers and business owners.
First Impressions and Design Personality
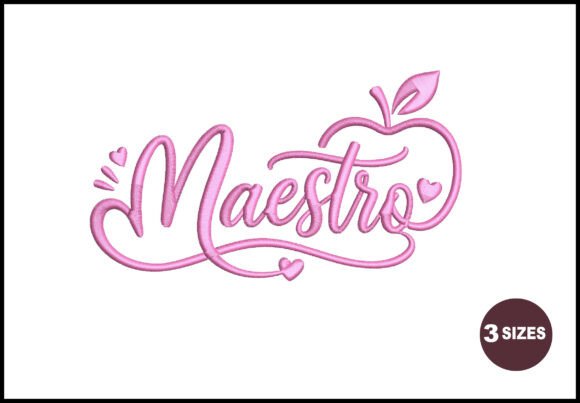
Upon loading the embroidery file into my editing software, Maestro presents a distinct visual weight that suggests confidence. Unlike generic clip-art style school motifs, this design carries an air of sophistication and structure. The layout feels balanced, making it suitable for center-chest placement on apparel or as a focal point on accessories. For an Etsy seller or boutique owner, this matters because customers are increasingly looking for items that feel curated rather than mass-produced.
The mood Maestro evokes is one of academic pride mixed with artistic flair. It avoids being overly juvenile, which expands its marketability from elementary school gear to high school seniors, college alumni, and even faculty appreciation gifts. When planning a personalized gift or a line of custom apparel, this versatility is a significant asset. However, the complexity of the design elements means you must pay close attention to the interplay between fill areas and outline details to maintain that polished aesthetic after washing and wear.
Real-World Application: The Sweatshirt Test
To truly judge Maestro, I moved past the screen and set up a test run on a mid-weight cotton fleece sweatshirt. This is a staple item for any craft business or holiday season lineup. My primary concern was how the design would interact with the nap of the fleece without sinking or distorting.
I used a cutaway stabilizer to support the stitch density, which appeared substantial in the software. During stitching, the registration held up remarkably well. The transitions between different stitch types were smooth, preventing the puckering that can ruin a sweatshirt embroidery project. The final result had a crisp definition that photographed beautifully for printable mockups and social media listings. For makers selling on platforms like Etsy, having a design that looks as good in person as it does digitally is crucial for maintaining customer trust and reducing return rates.
This test confirmed that Maestro is robust enough for commercial embroidery workflows where consistency across multiple garments is non-negotiable. If you are producing matching sets for a choir, debate team, or graduating class, the design maintains its structural integrity across different hoopings.
Fabric Compatibility and Technical Considerations
While Maestro performed excellently on fleece, not every substrate will be forgiving. As experienced embroiderers know, a design's success often depends on matching the fabric texture to the stitch type. Here are my specific observations for using this design effectively:
- Stabilizer Selection: Do not skimp here. Because Maestro likely contains detailed segments, a tear-away alone may cause registration shifts on knits. Always opt for a quality cutaway for stretchy fabrics like t-shirts or sweatshirts to prevent distortion over time.
- Textured Fabrics: If applying this to terry cloth towels or pique polo shirts, use a water-soluble topping. This prevents the stitches from sinking into the pile, ensuring the fine details remain visible.
- Thin or Sheer Materials: Exercise caution when using Maestro on lightweight baby clothes or sheer curtains. The density required to make the design opaque might be too heavy for delicate fibers, potentially causing tearing or an uncomfortable drape. Always test on scrap fabric first.
- Dark vs. Light Backgrounds: Check your thread contrast. Intricate internal details can get lost on dark fabrics unless you adjust the underlay or choose lighter thread colors. Conversely, on white fabric, ensure your bobbin tension is perfect to avoid dark backing showing through.
Navigating Hoop Sizes and Placement
One critical step before stitching is verifying your hoop size. The provided formats include PES, DST, EXP, HUS, VP3, VIP, XXX, and SEW, covering major brands like Brother, Tajima, Husqvarna Viking, and Janome. However, file inclusion does not guarantee the design fits your specific machine’s maximum stitch area. Always measure the physical dimensions in your software against your hoop limits. Resizing a complex design like Maestro by more than 10-15% can alter stitch density and satin stitch widths, potentially leading to thread breaks or coverage gaps. If significant resizing is needed, re-digitizing or consulting a professional digitizer is safer than simply stretching the file.
Commercial Value and Product Strategy
For creative entrepreneurs, Maestro represents more than just a pretty picture; it is a potential revenue stream. Its aesthetic lends itself well to higher price-point items. Instead of basic iron-on transfers, offering a premium handmade product featuring this embroidery justifies a markup based on craftsmanship and durability.
Consider expanding beyond standard apparel. Maestro could serve as an elegant label on canvas tote bags, a sophisticated accent on library-themed pillow covers, or a unique branding element for teacher appreciation baskets. When listing these items, emphasize the quality of the embroidery and the thoughtful design choice. Buyers searching for school embroidery often want something that feels special and enduring, not disposable.
If you are a digital product seller offering finished goods, ensure you understand the licensing terms associated with the file. While the technical formats are versatile, the right to sell physical items versus digital files varies. Protecting your business starts with respecting intellectual property and clearly communicating what you offer to your clients.
Designer Notes for Best Results
Before adding Maestro to your permanent collection or current production schedule, keep these practical tips in mind to ensure professional outcomes:
- Run a Stitch-Out Test: Never stitch directly onto a final garment without a test run on similar scrap material. Verify that the thread colors blend well and that the design lies flat.
- Inspect Small Details: Zoom in during the editing phase. Ensure that any tiny text or intricate lines are wide enough to stitch cleanly. If they look too thin in the software, they will likely disappear or fray on fabric.
- Mockup Verification: Create black and white mockups alongside color versions. This helps identify value contrast issues that color might mask, ensuring the design reads clearly from a distance.
- Wash Testing: If selling baby embroidery or kitchen linens, wash and dry your test piece aggressively. Check for loose threads, shrinkage, or stabilizer residue. Your customers expect longevity, and proactive testing builds that reliability.
- File Management: Since this pack includes multiple formats (PES, DST, EXP, HUS, VP3, VIP, XXX, SEW), organize them clearly in your digital assets library. Using the native format for your specific machine usually yields better results than converting files yourself.
Maestro stands out as a capable and attractive option for those in the embroidery project space, particularly within the educational niche. By approaching it with technical diligence and creative strategy, you can transform a digital file into a tangible, profitable asset for your handmade business. Whether you are crafting a personalized keepsake or stocking your shop for the back-to-school rush, this design offers the quality and character necessary to satisfy discerning clients and elevate your brand's reputation.